Sunday, December 31, 2006

Including Code Samples in Blogger Posts

To include code samples as nice as mine, do the following. Of course, the following instructions are blogger specific. Also, the code was copied from All about Linux.

Go to your template and select "Edit HTML". Add the following code to the section entitled Posts.
.post pre {
background-color: #efefef;
font-family: 'andale mono','Courier New', Monaco, monospace;
font-size: 1.25em;
padding: 1em 1em;
width: 90%;
border: 2px dotted #ddd;
overflow: auto;
}
Now if you want to include some code in your post, then just do the following.
<pre><code>Include code here.</code></pre>
You will have to replace HTML characters (like <>) with the appropriate decimal codes. There are plenty of sites with character tables.

Saturday, December 30, 2006

Subversion for Document Management

I am going to use subversion and ssh for document management and off-site document storage. Subversion is a revision control system. It will allow me to work on the project from any computer since I can download the project files, work on them, and then upload the changes. Moreover, Subversion will keep track of the revisions, allowing me to revert to older versions if necessary. This post describes how to use subversion for document or small project management. See the work cycle section of the Subversion Book for a more detailed exposition. [I recommend using ssh-keys and ssh-agent on your main computer so you don't have to type your ssh password several times per session; see the post on creating and using ssh-keys.]

Setup. Install Subversion. Both on your client machines and on the server (ask your sysadmin). On Ubuntu:
apt-get install subversion
Below the subversion server will be called svn.server.com, and the username will be username. I ssh'd to svn.server.com and ran the following command to create a Subversion repository where Subversion will store the projects.
svnadmin create ~/subversion-repo
Create Project. To create a new project, create a new directory and populate the directory with files that you will need.
mkdir brilliant-paper
Import Project. Import the project into your subversion repository with the following command.
 svn import -m "My Brilliant Paper" brilliant-paper svn+ssh://username@svn.server.com/home/username/subversion-repo/brilliant-paper

Now delete your project directory. (You will download a working copy in the next step.)
 rm -rf brilliant-paper/*
Work Cycle. The following steps describe how to use Subversion to work on the project.
  1. Download Project. Sit down at a computer, any computer, install Subversion if necessary, and download the latest version of the project. Either:
    • download the project, if is hasn't been downloaded before:
      svn checkout svn+ssh://username@svn.server.com/home/username/subversion-repo/brilliant-paper

    • or update the project if you've already downloaded a version of the project: in the project directory run,
      svn update
  2. Make changes.
    • You can edit any files that exist and subversion will detect those changes.
    • If you want to add a new file, then use the add command.
      svn add newfile
    • Similarly, you can delete, copy and move files or directories.
      svn delete filename
      svn copy filename copyname
      svn move filename newname
  3. Examine Changes. Nothing above makes changes to the project in the repository. Before you commit any changes you might want to examine the changes you have made. Use the 'svn status' and 'svn diff' commands. If a file has changed and you want to revert to a previous version, then revert to the most recent version of that file in the repository with the command 'svn revert filename'.
  4. Commit Changes. Commit your changes with the commit command.
    svn commit -m 'Write a summary of your changes here.'
  5. Check Commit. In the top of your project directory run the status command.
    svn status
    If there is no output, then all changes have been committed. If there is some output, then there are files that have been changed or added, but not committed for some reason. See the help page to decode the output: svn help status
References.
SSH-Keys to simplify SSH Logins

By creating an ssh key you can login to a remote machine multiple times with only one password.

Setup: Create the ssh-key.

Create the ssh-key with the following command. Hit enter; pick a good passphrase.
ssh-keygen -t rsa
Copy the resulting public key to the remote machine:
scp ~/.ssh/id_rsa.pub remote.server.com:~/.ssh/authorized_keys
Enter you password.


Using ssh-agent.

The following command adds your new ssh key to your 'keyring'. You will be prompted for the passphrase.
ssh-add
[If the above command fails, then ssh-agent is not running. Start it with eval `ssh-agent`.]

Now you won't be prompted for the passphrase again until the next time you log in. You can ssh into the remote machine using ssh as usual without being prompted for a password.

Wednesday, December 20, 2006

LaTeX Editing on the 13.3" Macbook (on Linux)

Here is my configuration for LaTeX editing on the 13.3" Macbook (running Linux). I configured gvim and xdvi so that the former occupies the left half of the screen and the latter occupies the right half of the screen. I then use a program that watches the tex file for changes; when I save any changes, the file is compiled and the xdvi window is updated. (One such program is atchange.)

My ~/.gvimrc file sets the window position and geometry of the gvim window.
set lines=39 columns=73
winpos 0 0
My ~/.Xresources file sets the window position, geometry and other options for xdvi.
xdvi*paper: us
xdvi*expert: true
xdvi*pixelsPerInch: 300
xdvi*mfMode: ljfour:600
xdvi*thorough: true
xdvi*background: light yellow
xdvi*shrinkFactor: 7
xdvi*geometry: 590x745-0+0
xdvi.sideMargin: 2cm
xdvi.topMargin: 2cm
xdvi.mainTranslations: #override\
Shift<key>space: up-or-previous()\n\
<key>space: unpause-or-next()\n\
<key>j: down(0.015)\n\
<key>k: up(0.015)\n\
<key>l: right(0.015)\n\
<key>h: left(0.015)
My ~/.vimrc file sets the textwidth, syntax-highlighting and some other options.
" enable syntax highlighting
syntax enable

" hightlight search
set hlsearch

" set textwidth to 70 to cause wrapping
set textwidth=70

" autoindenting
set ai

" 50 lines of command lines history
set history=50

" .viminfo file with 50 lines of registers
set viminfo='20,\"50

" show the cursor position all the time
set ruler

" turn on speel cheqing
set spell
Finally, check out the LaTeX Suite package that provides several useful tools for LaTeX editing with vim.

Enable Shift-Space in XDvi for Page-Up

I use evince and xdvi for document viewing and I want the page navigation to be same: while both use Space for page down, the page up keys are difference (evince uses Shift-Space; xdvi uses Delete). This is how to set Shift-Space to act as page up for xdvi.

Add the following lines to ~/.Xresources (or ~/.Xdefaults).
xdvi.mainTranslations: #override\
Shiftspace: up-or-previous()\n\
space: unpause-or-next()\n
Then run the following command
xrdb ~/.Xresources
You're all set.

Some notes.
  1. The order is important. The translation table is searched from top to bottom, so if the line beginning space... appeared before the line Shiftspace..., then both Space and Shift-Space would trigger unpause-or-next().
  2. There are many other options for xdvi (and other programs) that can be set in ~/.Xresources. See the man page for xdvi for more information.

Thursday, November 09, 2006

Making the Apple Command Key work Properly in Linux

This post explains how to get the Apple Command key to behave like an Alt key; and how to configure Firefox to use the Alt key instead of the Control key as its accelerator key. The goal is to get Firefox and the Apple Command key to work similarly under both Mac OS X and Linux.

Map Command Key to Alt. Add the following lines to ~/.xmodmaprc.
! Set the left Apple key act as an alt key.
keycode 115 = Alt_L Meta_L
add mod1 = Alt_L Meta_L
The following command enacts these changes.
xmodmap .xmodmaprc
(These changes can be set to begin at boot time. Gnome notices the files and will ask you if you want to use it. There is an earlier post here on getting it to work in XFce4.)

Change Accelerator Key in Firefox. Launch Firefox. Type about:config in the location bar and hit enter. Set the following two attributes as follows.
ui.key.accelkey 18
ui.key.menuAccessKey 0
The first defines the accelerator key to be the Alt key, while the second disables accessing the menu from the keyboard, which is the usual behaviour for the Alt key.

Now restart Firfox. The menus should reflect the change by reading "Alt+" instead of "Ctrl+" in defining the shortcuts.

Sunday, November 05, 2006

Automatix: Automated Post-Installation Setup for Ubuntu

Automatix is a python script that automates some post-installation setup of Ubuntu. From the website, Automatix is a graphical interface for automating the installation of the most commonly requested applications in Debian based linux operating systems. This includes multimedia codecs, multimedia players, browser plugins, etc. The Automatix website includes a page delineating all the software installed by this script.

Add the Automatix repository to /etc/apt/sources.list.
## Automatix Repository
deb http://www.getautomatix.com/apt edgy main
Download and import the gpg key.
wget http://www.getautomatix.com/apt/key.gpg.asc
gpg --import key.gpg.asc
gpg --export --armor 521A9C7C | sudo apt-key add -
Install Automatix.
apt-get update
apt-get install automatix2
Run Automatix and select what you want to install. I selected just about everything (no wine).
automatix2

Resolution on the MacBook

To fix the resolution on the MacBook: activate the universe repositories and install 915resolution:
apt-get install 915resolution

Sunday, October 29, 2006

AIGLX + Beryl on MacBook

Install AIGLX. Following the instructions for setting up AIGLX, I did the following.
  1. Edit /etc/X11/xorg.conf file. My xorg.conf file is below.
  2. Restart the X server with '/etc/init.d/gdm restart'.

    # /etc/X11/xorg.conf (xorg X Window System server configuration file)
    #
    # This file was generated by dexconf, the Debian X Configuration tool, using
    # values from the debconf database.
    #
    # Edit this file with caution, and see the /etc/X11/xorg.conf manual page.
    # (Type "man /etc/X11/xorg.conf" at the shell prompt.)
    #
    # This file is automatically updated on xserver-xorg package upgrades *only*
    # if it has not been modified since the last upgrade of the xserver-xorg
    # package.
    #
    # If you have edited this file but would like it to be automatically updated
    # again, run the following command:
    # sudo dpkg-reconfigure -phigh xserver-xorg

    Section "Files"
    FontPath "/usr/share/X11/fonts/misc"
    FontPath "/usr/share/X11/fonts/cyrillic"
    FontPath "/usr/share/X11/fonts/100dpi/:unscaled"
    FontPath "/usr/share/X11/fonts/75dpi/:unscaled"
    FontPath "/usr/share/X11/fonts/Type1"
    FontPath "/usr/share/X11/fonts/100dpi"
    FontPath "/usr/share/X11/fonts/75dpi"
    FontPath "/usr/share/fonts/X11/misc"
    # path to defoma fonts
    FontPath "/var/lib/defoma/x-ttcidfont-conf.d/dirs/TrueType"
    EndSection

    Section "Module"
    Load "i2c"
    Load "bitmap"
    Load "ddc"
    Load "dri"
    Load "extmod"
    Load "freetype"
    Load "glx"
    Load "int10"
    Load "type1"
    Load "vbe"
    Load "dbe"
    EndSection

    Section "InputDevice"
    Identifier "Generic Keyboard"
    Driver "kbd"
    Option "CoreKeyboard"
    Option "XkbRules" "xorg"
    Option "XkbModel" "pc105"
    Option "XkbLayout" "us"
    Option "XkbOptions" "lv3:ralt_switch"
    EndSection

    Section "InputDevice"
    Identifier "Configured Mouse"
    Driver "mouse"
    Option "CorePointer"
    Option "Device" "/dev/input/mice"
    Option "Protocol" "ExplorerPS/2"
    Option "ZAxisMapping" "4 5"
    Option "Emulate3Buttons" "true"
    EndSection

    Section "InputDevice"
    Driver "wacom"
    Identifier "stylus"
    Option "Device" "/dev/wacom" # Change to
    # /dev/input/event
    # for USB
    Option "Type" "stylus"
    Option "ForceDevice" "ISDV4" # Tablet PC ONLY
    EndSection

    Section "InputDevice"
    Driver "wacom"
    Identifier "eraser"
    Option "Device" "/dev/wacom" # Change to
    # /dev/input/event
    # for USB
    Option "Type" "eraser"
    Option "ForceDevice" "ISDV4" # Tablet PC ONLY
    EndSection

    Section "InputDevice"
    Driver "wacom"
    Identifier "cursor"
    Option "Device" "/dev/wacom" # Change to
    # /dev/input/event
    # for USB
    Option "Type" "cursor"
    Option "ForceDevice" "ISDV4" # Tablet PC ONLY
    EndSection

    Section "Device"
    Identifier "Intel Corporation Mobile Integrated Graphics Controller"
    Driver "i810"
    Option "XAANoOffscreenPixmaps"
    BusID "PCI:0:2:0"
    EndSection

    Section "Monitor"
    Identifier "Color LCD"
    Option "DPMS"
    HorizSync 28-64
    VertRefresh 43-60
    EndSection

    Section "Screen"
    Identifier "Default Screen"
    Device "Intel Corporation Mobile Integrated Graphics Controller"
    Monitor "Color LCD"
    DefaultDepth 24
    SubSection "Display"
    Depth 1
    Modes "1280x800"
    EndSubSection
    SubSection "Display"
    Depth 4
    Modes "1280x800"
    EndSubSection
    SubSection "Display"
    Depth 8
    Modes "1280x800"
    EndSubSection
    SubSection "Display"
    Depth 15
    Modes "1280x800"
    EndSubSection
    SubSection "Display"
    Depth 16
    Modes "1280x800"
    EndSubSection
    SubSection "Display"
    Depth 24
    Modes "1280x800"
    EndSubSection
    EndSection

    Section "ServerLayout"
    Identifier "Default Layout"
    Screen "Default Screen"
    InputDevice "Generic Keyboard"
    InputDevice "Configured Mouse"
    InputDevice "stylus" "SendCoreEvents"
    InputDevice "cursor" "SendCoreEvents"
    InputDevice "eraser" "SendCoreEvents"
    Option "AIGLX" "true"
    EndSection

    Section "DRI"
    Mode 0666
    EndSection

    Section "Extensions"
    Option "Composite" "Enable"
    EndSection


Install Beryl. Follow the instructions:
  1. Add repository.
    deb http://ubuntu.beryl-project.org/ edgy main-edgy
  2. Import key.
    wget http://ubuntu.beryl-project.org/quinn.key.asc -O - | sudo apt-key add -
  3. Install Beryl.
    apt-get update
    apt-get install beryl emerald-themes
  4. [Optional] Test the Beryl window manager.
  5. beryl-manager
  6. Add beryl-manager to System -> Preferences -> Sessions -> Startup Programs.
  7. Restart the X server with '/etc/init.d/gdm restart'.

Saturday, October 28, 2006

Dual-Boot Ubuntu Edgy Eft (6.10) on a MacBook

The following explains how to dual-boot Mac OS X and Ubuntu Edge Eft (6.10) on the new Intel Macbooks. This will only deal with the installation, post-installation setup will be dealt with in a later post.

This is an amalgamation of instructions for Ubuntu Dapper Dan (6.06) from various sources. Most notably, Felipe Alfaro Solana's blog entry about
Installing Ubuntu Linux on a MacBook Pro.

Software Update.

  1. Update Mac OS X.
    Apple Menu -> Software Update...
  2. Update Firmware if needed. See the following webpage.
    http://docs.info.apple.com/article.html?artnum=303880

Install the rEFIt Boot Menu.
  1. Download from http://refit.sourceforge.net.
  2. Mount the image.
  3. Drag the efi folder to Macintosh HD icon on desktop.
  4. Open a terminal.
    cd /efi/refit
    ./enable-always.sh
  5. Unmount the image.

Resize Hard Drive.

I have a 80G hard drive. I will create a 50G partition for OS X and the rest for Linux. I will further partition the latter partition into three partitions during the Ubuntu installation: one of 15G (/home); one of 2G (swap); and the rest for the root partition /.
diskutil resizeVolume disk0s2 50G
I got the name of my disk (disk0s2) from the output of the mount command. Look for the disk mounted on /.

[You can use Bootcamp for partitioning instead, if you'd like.]


Install Ubuntu.
  1. Download the Ubuntu CD image (i386 Desktop) from www.ubuntu.com.
  2. Create a CD.
  3. Put it in your computer and reboot.
  4. During startup hold the C key.
  5. Check CD for defects. It takes a while, but is good to do.
  6. Reboot.
  7. Select Start or install Ubuntu. The Ubuntu desktop loads.
  8. Click the Install icon.
  9. Follow the on screen instructions. Some notes on partitioning:
    • Manually edit the partition table. I created: 2G swap; 15G /home; 7+G /.
    • On the next screen make sure that EFI GPT partition is not mounted.
    • Also make sure that your partitions are mounted in the correct spots (swap, /home, /).
    • Remember what your / partition is (mine is /dev/sda5).
  10. Grub will fail to install. This is expected. We'll install LILO later.
  11. Make the / partition bootable (mine is /dev/sda5).
    parted /dev/sda
    set 5
    boot
    on
    quit
  12. Install LILO.
    mount -t proc none /target/proc
    mount -o bind /dev /target/dev
    chroot /target
    apt-get install lilo lilo-doc linux-686-smp
  13. Create /etc/lilo.conf, adjusting /dev/sda5 to reflect your / partition.
    boot=/dev/sda5
    default=Ubuntu
    map=/boot/map
    delay=20
    image=/vmlinuz initrd=/initrd.img
    root=/dev/sda5
    append=noapic
    label=Ubuntu
    read-only
  14. Install LILO.
    lilo -b /dev/sda
  15. Exit the chrooted environment.
    exit
  16. Check that LILO is installed. Look for LILO at the beginning of the output of the following command.
    hexdump -C /dev/sda | less
  17. Reboot.
    umount /target/proc
    umount /target/dev
    umount /target
    reboot
  18. Select "Start Partitioning Tool" at the rEFIt menu. It might ask you to sync the MBR GPT maps. Select yes.
  19. Reboot.
  20. Select the Penguin at the rEFIt menu.

Wednesday, September 20, 2006

Avoiding Google's Local Redirection

When visiting www.google.com from a Canadian IP address I am automatically redirected to www.google.ca. To correct this unwanted behaviour click on Go to Google.com at the bottom of the latter page.

Editing PDFs in Linux

Evince is my document viewer of choice these days because it supports PDF, PostScript, DVI and DejaVu files. But it doesn't support annotating documents. So far, I have found the following programs for editing PDF files.

flpsed is a PostScript annotator. So convert PDF files to PostScript using pdftops and use flpsed.

Scribus is an open-source application for "professional page layout". This means that it is overkill for a PDF viewer if you only annotate occasionally. Hmm. It seems that you have to convert to PostScript here as well (then File -> Import -> Import PS).

These programs can be installed with apt-get.
apt-get install evince
apt-get install scribus
apt-get install flpsed
I wonder how hard it would be to merge flpsed and evince.

Thursday, September 14, 2006

Xournal (or Annotating PDF files)

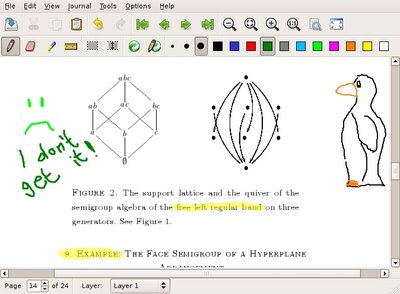
Xournal is software written specifically for tablet computers for hand writing notes, or journals, say. I've used it on my Nokia 770. But it has an excellent feature that makes it useful on a non-tablet computer: It allows you to annotate pdf files! This includes highlighting and doodling. Here is a screenshot.


To install it, download the latest version from the project website. Unpack it and run the script called install-binary.
tar -xzvf xournal.tar.gz
cd xournal-0.3.1
sudo ./install-binary

Wednesday, September 13, 2006

iPod Shuffle and (X)Ubuntu

I got a free iPod shuffle for switching banks. Yeah, I'm a gadget whore.

Here is how to use it with (X)Ubuntu.

Software. Install GNUPod.
apt-get install gnupod-tools
Install iPod Shuffle DB Rebuilder (shuffle_db).
Download the script from the project website.
Initialization. This only needs to be done once (or anytime you mess up the shuffle).
mount /dev/sda1 /media/ipod/
gnupod_INIT -m /media/ipod/
mkdir /media/ipod/music/
cp rebuild_db.py /media/ipod/
The device file /dev/sda1 might differ on different machines.

Transfering Music
is a four step process: mount; copy mp3s into the music directory; rebuild the database; umount.
mount -o exec /dev/sda1 /media/ipod
cp ~/music/songs /media/ipod/music/
/media/ipod/rebuild_db.py -l music
umount /media/ipod
Alternatives. You can transfer music to the Shuffle with GNUPod or GTKPod, but I like the shuffle_db better because it is very simple and because it maintains directory structure.

Sunday, September 10, 2006

Google Picasa

Install Google's Picasa. Download the .deb package for Debian/Ubuntu and install with
dpkg -i picasa_2.2.2820-5_i386.deb

Pipe Panic!

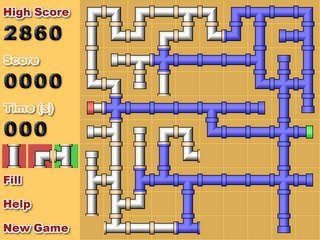
I came across Pipe Panic for the Nokia 770, and I really like it. It's a pipe connecting game: the goal is to connect pipes to create a leak-proof path from a water source to its destination.

Requirements. Install the libSDL libraries with apt-get.
apt-get install libsdl1.2-dev
Installation. Download the sourcecode from the Pipe Panic website.

Extract and compile the package.
tar -xzvf pipepanic-0.1.3-source.tar.gz
cd pipepanic
make
(For the last step above you need to have the build tools installed. See my earlier post on post-installation setup.)

Test it.
./pipepanic -f
Install system wide.
mv pipepanic pipepanic.bin
Create a file called pipepanic containing the following three lines.
#!/bin/bash
cd /usr/local/pipepanic-0.1.3
exec ./pipepanic.bin -f
Copy the pipepanic directory into /usr/local.
cd ..
mv pipepanic-0.1.3-source /usr/local/pipepanic-0.1.3
Create symbolic links
cd /usr/local/bin
ln -s ../pipepanic-0.1.3/pipepanic .
Add a menu entry. To add an entry to the Xfce menu, create a file called /usr/share/applications/pipepanic.desktop containing the following.
[Desktop Entry]
Encoding=UTF-8
Name=Pipe Panic
Comment=Connect the Pipes!
Exec=pipepanic
Icon=
Terminal=false
X-MultipleArgs=false
Type=Application
Categories=Application;Game;ArcadeGame;

Sunday, August 20, 2006

Start GNU Screen Automatically

GNU Screen is a very useful program that creates multiple interactive shells inside one physical terminal. It is extremely useful for system administrators and for using with SSH connections and tunnels. See the webpage for more information, guides and manuals.

To have screen start automatically upon login, add the following line to ~/.bash_profile.
exec /usr/bin/screen

Add the following to ~/.bashrc. This produces a message acknowledging screen is activated.
if [ "$TERM" = "screen" ]; then
echo "[ screen is activated ]"
fi

Add the following to ~/.screenrc. It prevents screen from popping up its startup message; and defines the number of scrollback lines available.
startup_message off
defscrollback 10000

Finally, to force xterm to start bash as a login shell (so that bash reads ~/.bash_profile), add the following line to ~/.Xresources. (This will have to be modified appropriately for other terminals.)
Xterm*loginShell: true

You can implement the changes to ~/.Xresources with the following command.
xrdb ~/.Xresources

Friday, August 18, 2006

Vi editing mode on the command line

To set the default command line editing mode to vi (instead of emacs), add the following to ~/.inputrc.
set editing-mode vi
set keymap vi-insert
Or add the following to ~/.bashrc.
set -o vi

Xmodmap on login.

I use xmodmap to change a few keybindings. This post describes how to get xmodmap to load your settings upon login.

Create ~/.xinitrc (or maybe ~/.xsession) with two lines: the first loads your xmodmap file; the second starts the windowmanager. Since I am using xfce4, my .xinitrc file looks like so.
/usr/bin/xmodmap ~/.xmodmaprc
exec /usr/bin/startxfce4
Exit. At the login screen change the "session" setting to "Default System Session" and log in.

Here is my .xmodmaprc file.
keycode 112 = 30

! Swap Caps_Lock and Control_L
! since my pinkie hurts.

remove Lock = Caps_Lock
remove Control = Control_L
keysym Control_L = Caps_Lock
keysym Caps_Lock = Control_L
add Lock = Caps_Lock
add Control = Control_L

! bind the menu key to the right control key
! since my laptop does not have a right CTRL.

keycode 117 = Control_R
add Control = Control_R

! On the Compaq Presario 2800CA, the the following
! keycodes are listed for the special keys at the
! top of the keyboard.
!
! 163 i
! 158 envelope
! 154 magnifying glass
! 239 music note
! 174 - (volume down)
! 176 + (volume up)

keycode 174 = F18
keycode 176 = F19

Two-Finger Scrolling on the Trackpad

Pre-requisites. You will need the xorg-dev package.
apt-get install xorg-dev
(You must also have compliers and libraries installed; see the Xubuntu 6.06 LTS post.)


Install the new Synaptics driver. The included synaptics mouse driver does not support two-finger scrolling, but the latest one does (0.14.6). So download the latest synaptics driver.
http://web.telia.com/~u89404340/touchpad
Extract and compile using 'make'.

Copy synaptics_drv.o into place. (I crashed my systems doing this, so you
may want to exit X before you put the driver in place.)
cp synaptics_drv.o /usr/lib/xorg/modules/input/
Now edit the InputDevice section of your xorg.conf file. My InputDevice section now reads like so.
Section "InputDevice"
Identifier "Synaptics Touchpad"
Driver "synaptics"
Option "SendCoreEvents" "true"
Option "Device" "/dev/psaux"
Option "Protocol" "auto-dev"
Option "HorizScrollDelta" "0"
Option "HorizTwoFingerScroll" "1"
Option "VertTwoFingerScroll" "1"
EndSection
(I only added the two *TwoFingerScroll options.)

Restart X.


Firefox. In about:config make the following changes.
mousewheel.withnokey.action 0
mousewheel.withnokey.numlines 1
mousewheel.withnokey.sysnumlines false
mousewheel.horizscroll.withnokey.action 0
mousewheel.horizscroll.withnokey.numlines 1
mousewheel.horizscroll.withnokey.sysnumlines false
general.smoothScroll true

More Post-Installation Packages

Image Magick for image manipulation.
  • apt-get install imagemagick
Xnest.
  • apt-get install xnest
LaTeX macros for Vim.
  • aptitude install vim-latexsuite
The Amarok music player.
  • apt-get install amarok amarok-xine
Terminal program for changing audio settings.
  • apt-get install aumix
Download the Debian package for skype from skype.com, then
  • dpkg -i skype*.deb
OpenOffice.org. (This is included in Ubuntu, but not in Xubuntu.)
  • apt-get install openoffice.org
Radeon tool: for effecting changes on Radeon graphics cards.
  • apt-get install radeontool
More games: the Multiple Arcade Machine Emulator; and a gui frontend.
  • apt-get install xmame-x
  • apt-get install kxmame

Xubuntu 6.06 Installation

I installed Xubuntu 6.06 because I wanted to try XFce4.

Initial impression: XFce is quite nice and seems fast. I just need to learn the keyboard shortcuts.

Post-Installation: Followed some of the suggestions on http://www.cs.cornell.edu/~djm/ubuntu; did the following.

Add networking information (essid, keys, etc.).
  • vi /etc/network/interfaces
  • /etc/init.d/networking restart
Update and Upgrade.
  • apt-get update
  • apt-get upgrade
Copy my xorg.conf into place.
  • cd /etc/X11
  • mv xorg.conf{,.original}
  • cp /scratch/etc/X11/xorg.conf .
Edit sources.list.
  • cp sources.list sources.list.original
  • vi sources.list
  • apt-get update
Install Microsoft fonts.
  • apt-get install msttcorefonts
Install mutlimedia codecs.
  • wget -c -O /tmp/w32codecs.deb http://packages.freecontrib.org/ubuntu/plf/pool/dapper/i386/non-free/w32codecs/w32codecs_20060611-1plf1_i386.deb
  • dpkg -i /tmp/w32codecs.deb
  • apt-get install libdvdread3
  • /usr/share/doc/libdvdread3/examples/install-css.sh
Install mutlimedia players.
  • apt-get install lame sox ffmpeg mjpegtools mpg321 vorbis-tools
  • apt-get install mplayer
  • sed -i.backup -e's@vo=x11,@vo=xv,@g' /etc/mplayer/mplayer.conf
  • apt-get install sound-juicer
Install Acrobat Reader.
  • apt-get install acroread
Install Flash plugins.
  • apt-get install flashplugin-nonfree
  • update-flashplugin
Install Java (Sun).
  • apt-get install sun-java5-jre sun-java5-plugin
  • update-alternatives --config java
Install LaTeX.
  • apt-get install tetex-base tetex-bin tetex-extra gv xpdf-reader texinfo texi2html dvipng sam2p tetex-doc dialog psutils
Install Octave (Matlab replacement) and Gnuplot.
  • apt-get install octave
  • apt-get install gnuplot{,-doc}
Install subversion.
  • apt-get install subversion
Install vim-gtk and set it as the default editor.
  • apt-get install vim-gtk vim-doc
  • sed -i.backup.gvim -e's@gedit.desktop@gvim.desktop@g'
    -e's@text/x-csrc=gvim.desktop@text/x-csrc=gvim.desktop\ntext/x-c++hdr=gvim.desktop\ntext/x-c++src=gvim.desktop\ntext/x-csharp=gvim.desktop\ntext/x-tex=gvim.desktop@g'
    /usr/share/applications/defaults.list
  • sed -i.backup
    -e's@MimeType=text/plain;@MimeType=text/plain;text/html;text/css;text/xml;text/x-dtd;text/x-chdr;text/x-csrc;text/x-c++hdr;text/x-c++src;text/x-java;text/x-csharp;text/x-tex;text/x-bibtex;text/x-readme;@g'
    -e's@NoDisplay=true@NoDisplay=false@g' /usr/share/applications/gvim.desktop
Install games.
  • apt-get install supertux
  • apt-get install frozen-bubble
Install Openssh-server.
  • apt-get install openssh-server
Install basic compilers and libraries.
  • apt-get install build-essential manpages-dev

Linux Wisdom

The following posts document various linux tasks.

For the record, I generally use Ubuntu, most recently Xubuntu.